Wednesday, November 18, 2009

Kermit the Frog Cake

It was my boyfriend's birthday on 11th. He loves the Muppets and he does a wicked Kermit the frog impression. So I made him a Kermit cake. Kermit is constructed from a devil's food cake, cream cheese frosting, food coloring and mini chocolate chips.

I'll like to thank my roommate Kelsey. She's always willing to lead a hand. Speaking of roommates I think all of them deserve a shout out. (Meghan and Kez you guys rock!)We learned the Kermit looks like an ODDISH at this stage of his development.


Soulless Kermit will haunt your dreams!


Chop off Kermit's eye's first, he will be absolutely thrilled! I think we did a pretty fine job. Happy Birthday Justin! If anyone is wondering he loved the cake. :)

Everything's HunkyDorky,
Szpunar

Sunday, November 1, 2009

Doctor Who Halloween Costumes


Last night was a Halloween filled with Gallifreyan goodness. My friends and I dressed as characters from the popular British Doctor Who Series. (I'm the Dalek) We all love the show so we just had to do it. Sadly, since this is the states very few people knew who we were. However the ones that did, definitely we're filled with fanboy joy. We entered the costume contest with lots of cheers from the audience. However, we didn't win because none of the judges knew who we were supposed to be. Either way it was great fun. I just hope that when everyone went home Halloween night and google searched Doctor Who.


At least I know that you all will appreciate our hard work. The Tardis is now sitting in our living room next to our Tenth Doctor poster.
Everything's HunkyDorky,
Kelly Szpunar

Sunday, October 18, 2009

Edible Snails

A week back was my friend's Nina's birthday. So we made snails. She LOVES snails! The first thing we did was bake a box of brownies. Next we took the brownies and mushed them up with 3/4 can of cream cheese frosting. We shaped them into disks. Put them in the freezer for 15 minutes or leave them in the fridge for a few hours.It was 2 in the morning when we did this. So we ended up making the excess into this.
I know classy right.
The next day we sent it across the hall with our friend to eat in front of his roommates and this is what happened.


We dipped the brownie disks in white chocolate to make the snail shells. We used marshmallow fondant dyed with food coloring to create the bodies.
Here's the elusive snailacorn! .
She really loved the result. Happy Birthday Nina Snail! I would like the thank my friends for all they're help making these sweet little critters.
Everything's Hunkdorky,
Kelly

Saturday, October 3, 2009

Circuit Board Cake

Today when I checked my inbox I found this awesome techy cake:

This cake was made by Hunky Dorky reader Kaylen Treu for her father's birthday! He's one lucky nerd Dad! Wait, is that a dad whose a nerd or the father of one? Hmm, I guess in this family it applies both ways.

Here's Kaylen's directions on how she created this computer chip confectionery.

You make your cake, whatever flavor, (this one is excellent: http://allrecipes.com/Recipe/One-Bowl-Chocolate-Cake-III/Detail.aspx) and wait until it cools. You have to flip it out onto a cake board. If the top is't flat enough, cut that part off. Frost it with some homemade buttercream icing (good recipe: http://allrecipes.com/Recipe/Buttercream-Frosting/Detail.aspx). Dye the fondant that dark green color by mixing black and green (use gloves) and save a lump to dye the light green color by using just a little bit of the green. Wilton's icing coloring works well. For the circuitry use Royal Icing (http://allrecipes.com/Recipe/Royal-Icing-III/Detail.aspx). It's the stuff you use on a ginger bread house and it doesn't taste all that good but it's just for a little design.

Thanks for sharing Kaylen! I'm sure your dad was thrilled.

Everything's HunkyDorky,
Sponzar

Wednesday, September 23, 2009

Borgship Bownies

First off I would like to apologize for my huge gap of time between posts. I will be posting more often from now on. Anywho, my friend's birthday was recently and he's a trekkie so I wanted to make him Borgship Brownies. This are really simple and tasty.
Here's what you need:
box of brownie mix
can of vanilla or cream cheese frosting
vanilla melting chocolate
mini marshmallows
pretzel sticks

I started with baking a box of brownies and frosting them with cream cheese frosting.

Then melt down some vanilla and drip some pretzel sticks.
Stick on some mini marshmallows.

Place on the chocolate pretzels. And you're done! I googled Borg Brownies before I started and was surprised that I didn't get any matching results. It makes me happy to know that I'm nerdy enough to think of star trek desserts. Hope you like them.
Everything's HunkyDorky,
Sponzar

Monday, August 24, 2009

Pokemon Birthday Cake

This cake was created for my friends at college. It's a welcome back to school and a birthday cake for those who had their birthday's during the summer months (which in my circle of friends is a lot). I know that the pokemon chosen seem random. However, they each were chosen because they represent the looks and/or personality of each of my friends.

This is my sister and I's first attempt with fondant, so I think it turned out well. We made our own marshmallow fondant because from what I've read is that it's much cheaper and tastier. It tastes like vanilla marshmallows. To add color we used gel food coloring. Here's the fondant recipe we used. We are very happy with the final result. I just hope I can transport it to school in one piece. The total cost of the cake was around $18 dollars.

Here's the back view
We constructed the figures from a batch of Rice Krispie treats. Each one was covered in colored fondant, we colored it with food color gel (try not to use the liquid food coloring because it will alter the consistency of the fondant and make it too watery).
For the grassy knoll, we use three boxes of cake mix. The buttercream recipe and frosting tip (the ones we used to make the Tribble cupcakes) were used to create the grass. The frosting grass was used to cover our not to perfect fondant cake covering. Still, I think it adds a lot of charm to the pokecake.

More marshmallow fondant was used to add Pokeballs, berries and other details.

After a three hour and 11 minute journey to school with a cake on my lap. (I had my car packed with my school things, so there was not really another option) we finally ate it. Here are some photos of my friends enjoying their pokecake. Happy Birthday to my buddies. I love them.

Everything's HunkyDorky,
Sponzar

Saturday, August 22, 2009

Okami Latch Hook Rug

This rug was created as a birthday present for my great friend and college room mate who just adores the game. If you haven't heard about it, you should check it out. It's a game with unique style and a lot of charm. The rug is about 21/2' long and 3' wide. I really wanted to make her an Okami carpet for her new room in our on campus apartment and this was the cheapest way I could find. The total cost of the project was around 25 dollars. It really is simple, but time consuming. I rushed to get it done in time for the start of the school year (done in about two weeks), so the process was not as enjoyable as it could have been. I also ran out of orange yarn near the end, so I had to go back to store. I bought the wrong shade of orange and had to go back again. That was fun. Any who...

Here's what I used to make it:
  • Blank latch hook canvas (purchased at a local craft store for 10 bucks and cut down to the desired size)
  • Permanent marker(s)
  • Latch Hook
  • Scissors
  • clear thread
  • Wool 0r Acrylic Yarn of need colors cut down to lengths of 2"
  • Cardboard for rolling and cutting yarn
  • Rubber cement
  • Scotch guard

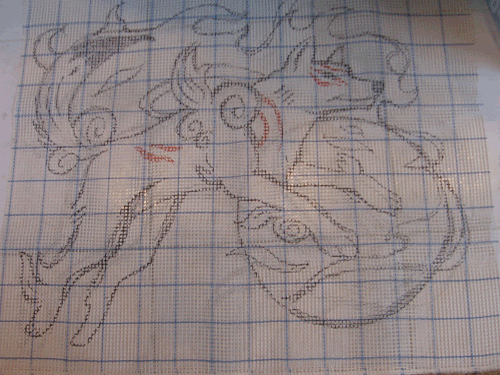
So to start I drew out on my design onto the canvas using black and red sharpies. Make sure you put it down on a white surface that you can clean. I used my tile floor and cleaned it off with that Mr. Clean Magic Eraser (that thing works wonders). Also leave about an inch boarder from each side to fold under later.

If you are not artistic you could use the grid method to transfer you design.

Now to the latch hooking.
Here's a video on how to do it. I had to have someone show me how to do it. I couldn't figure it out with just the picture directions. So if you need a visual demonstration here you are.


Repeat, A LOT.

Here's a gif of my progress:
Photobucket
I took a picture about every day (missed a coulpe though).
When you are finished latch hooking, you want to flip it over and use the rubber cement to seal up the back as best as you can. Make sure you do this in a well ventilated area.
Fold the bare canvas sides in and sew them down using thread.
Now you even out the yarn in the front using scissors.
Last, spray it with scotch guard to help protect it from getting dirty.

You should be warned that this type of rug is decorative, it will get trashed pretty easily. So treat your new custom rug with great care. If don't want to risk ruining it, you could use it as a wall hanging instead.

Everything's HunkyDorky,
Sponzar

Monday, August 17, 2009

Hello Kitty Cookies and then some...

\My sister loves Hello Kitty, so we made some cookies and a cookie cutter. For these I wanted to go for taste over looks. If you want to make them more attractive, you could use royal icing, instead of the canned frosting. They would turn out smoother and more professional looking.
Here's my custom cutter.
If you want to know how to make them, check out this post.

I'm not a fan of the sugar cookie. (I know I'm weird right) So I like to experiment with other types of roll out cookies. For these, I used a peanut butter roll out dough. They tasted great.

So now for decorating your kitties.
Gather some red, yellow and brown M&Ms.

You want to cut the yellow and brown in half.
In these pictures I feel like a candy dealer.
(Which is, when I think about, not really a bad thing.)For the bows pipe on the laces and apply a red M&M to the middle.Add her cute little face with you M&M halves. Just so you know, I really wanted to add whiskers using black shoestring licorice. However, apparently its like the Mewto of the candy world. I looked high and low for them, but the only place I could find them was the internet.
So in the end, I decided that the whiskers were not really needed. I didn't see the point of buying a 9lb bag of a candy that I don't enjoy eating and would peel off the cookie anyway. However, if you can find the elusive devils somewhere or you like them, by all means make your Hello Kitties more recognizable. Happy Dorky Baking.

Also, HunkyDorky reader Rachel Price, sent me these wonderful cookies that she made for her friends. I'm sure she will be worshipped for these amazing dorky cookies. They include PacMan, Inky & Pinky, "Red Velvet Red Ring Of Death" Cookies, Cinnamon Mario Stars, "Play-Doh Maddness" Sugar cookies. Thanks for sharing Rachel! I also like the empty wine bottles in the background. It looks like she had a really good time baking these treats.
*wink wink*
Everything's HunkyDorky,
Sponzar